NOW Function in Excel: Explained
In this article, you will learn how to use the NOW formula in Excel.
How does the NOW function work in Excel?
The NOW function in Excel returns the serial number of the current date and time. The function has no arguments, and the result is updated each time the spreadsheet is recalculated or opened.
When is the NOW formula useful in Excel?
The NOW formula in Excel is beneficial in several ways. Some of the most common uses include the following cases.
- Tracking the time a specific task is completed: You can insert the NOW formula in a cell next to a task description, and it will automatically update the time when the job is completed. Once your task is finished, you can copy and paste (value only) the date and time shown by the NOW function for recording purposes.
- Automated reminders: You can use the NOW formula in conjunction with other functions to create automated reminders. For example, you can use the IF function to check if a particular time has passed and display a reminder if it has.
- Time calculation: The NOW formula can be used to show the date and time before or after the specified number of days, combined with other functions, such as the EDATE and EOMONTH.
How to use the NOW formula in Excel
The NOW formula can be used in Excel by simply typing as follows:
This will automatically insert the serial number of the current date and time into the cell.
Note 1: If the format of the cell, which includes the NOW function, is general, Excel automatically changes the style of the cell to the one for your regional default setting.
Note 2: In a serial number, numbers to the right of the decimal point represent the time element.
For example, if you want to track when a task is completed, you can insert the NOW formula in the cell next to the task description, and it will automatically update the time when the job is over.
- Insert the NOW function in a cell.
- Copy (“Ctrl”+”C” for Windows or “Cmd”+”C” for Mac ) and paste (value only) it (”Alt”→”E”→”S”→”V”→”Enter” for Windows or “Ctrl”+”Cmd”+”V”→”V”→”Enter” for Mac) in the same cell by shortcut.
- The date and time shown in the cell are fixed and will not be updated even when the Excel file is recalculated or reopened.
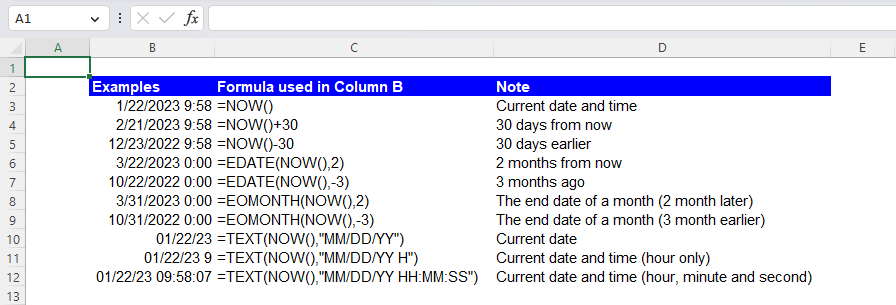
As another example, the NOW formula can be used as an argument in date-related formulas, such as EDATE and EOMONTH. For instance, the formula below shows the date two months later.
Note that the time element is removed from the outcome of other functions to show a specific “date” without time.
Additionally, you can format the results of the NOW function to display the date and time in a specific way. For example, you can use the "TEXT" function to format the date and time to show only the time, or only the date, or in a specific format.
The formula above will return the current date and time in the format of Month/Day/Year Hour:Minute:Second. You can also use the different built-in date and time formatting options in excel to format the result according to your needs.
The following screenshot shows examples of the NOW function combined with other formulas.
Does the NOW function update automatically?
Yes, the NOW function in Excel updates automatically each time the spreadsheet is recalculated or opened. It is important to remember that the NOW function only updates when the spreadsheet is recalculated or opened. Thus, if you want the function to reflect the current date and time at all times, you should make sure to recalculate the spreadsheet periodically or open it regularly. In case you want to stop the cell from updating automatically, you can copy the result of the formula and paste it as a value (without formatting or formula), as explained above. This will retain the current value in that cell, and it will not change even if you open the sheet after some time.
How do you use the NOW function to display today's date?
The NOW function in Excel returns the current date and time, and you can use it to display today's date by formatting the result to only show the date portion.
Here's an example of how you can use the NOW function to display today's date in a cell:
- Select the cell where you want to display today's date.
- Type "=NOW()" into the cell and press Enter.
- The cell will now show the current date and time.
- Right-click on the cell and select "Format Cells" from the context menu.
- In the "Number" tab, select "Date" from the list of categories.
- Select the date format that you want to use and click "OK".
- The date format you selected will be applied to the cell, and it will only show today's date.
Alternatively, you can also use the =TODAY() function, which returns the current date.
What is the difference between TODAY and NOW formulas in Excel?
The TODAY and NOW formulas in Excel are common in that they are automatically updated when the Excel file is refreshed or reopened. However, they are slightly different in terms of their functionality. The NOW function returns the current date and time as a serial number, which can be formatted to display the date and time differently. On the other hand, the TODAY function returns only the current date as a serial number. It does not include the time. So, in summary, you can use the NOW function when you want to know the current time and insert the TODAY formula (or the NOW function if you prefer) when you need to know the current date.
Analyze your live financial data in a snap in Google Sheets
Are you learning this formula to visualize financial data, build a financial model, or conduct financial analysis? In that case, LiveFlow may help you automate manual workflows, update numbers in real-time, and save time. You can access various financial templates on our website, from the simple Income Statement to Multi-Currency Consolidated Financial Statement. Are you interested in this product but are an Excel user? That’s not a problem at all. You can connect Google Sheets to Excel quickly.
To learn more about LiveFlow, book a demo.