
OFFSET Function in Google Sheets: Explained
In this article, you will learn what the OFFSET function is and how to use it in Google Sheets.
What is the OFFSET formula in Google Sheets, and why is it used?
The OFFSET returns a cell or a range moved by a certain number of rows and columns from a cell specified in the formula. This formula is beneficial when you want to get some information from a dynamic range or when you don’t know the address of the array you wish to refer to but know which cell the array starts from. We know it is hard to imagine how this function works in Google Sheets. Move on to the next section and learn how it works with examples.
How to use the OFFSET formula in Google Sheets
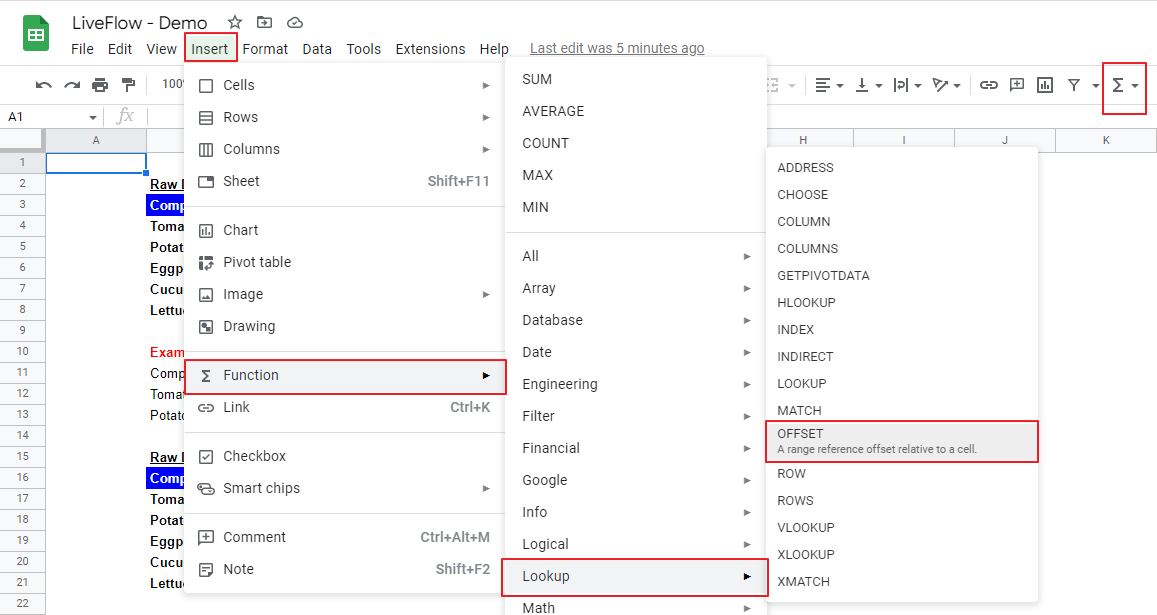
- Type “=OFFSET(” or go to “Insert” → “Function” (or directly navigate to the “Functions” icon) → “Logic” → “OFFSET”.
- Define a starting point from which a reference range moves by the number of rows and columns you specify in other arguments.
- Specify how many rows and columns the starting point shifts from the original cell by.
- Determine the size of the array, which is returned by the OFFSET formula.
- Press the “Enter” key.
The general syntax is as follows:
Cell_reference: This is the initial address from which a cell shifts by a certain number of rows and columns (specified in the following two arguments).
Offset_rows: This number should be an integer. The specified range moves by the number of rows defined in this argument.
Offset_columns: This argument needs to be an integer as well. The specified range makes a move vertically by the number of columns.
Height [Optional]: The height of the range.
Width [Optional]: The width of the range.
Note: “offset-rows” and “offset-columns” can be negative integers, but if the target destination is outside of the spreadsheet, the OFFSET formula returns “#REF!”. Also, the shifted range should not overlap the same size of the range starting from the starting points at all, as it causes a circular reference.
See the following examples of how the OFFSET function works in Google Sheets. In the first example, we will describe how the first argument (“cell_reference”) and the optional arguments (“height” and “width”) work because they are easier to understand. Then, we explain how the rest of the parameters (“offset_rows” and “offset_columns”) affect a return.
Example 1
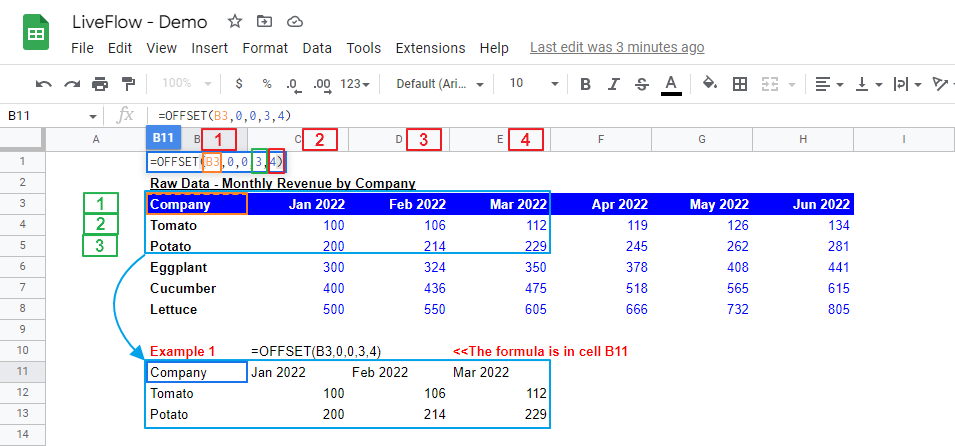
The arguments of this sample formula and their descriptions are as follows:
Cell_reference: B3 / Offset_rows: 0 / Offset_columns: 0
These three mandatory arguments mean that the starting point (cell B3) stays unchanged and spreads, and if the optional arguments are input, the specified range spreads from cell B3.
Height [Optional]: 3 / Width [Optional]: 4
How these two optional arguments work is visualized in the picture above. The green boxes illustrate how the “height” argument affects the output range, and the red boxes show how the “width” changes the output. As a result, the array with a 3x4 size starting from cell B3 is specified, and the range spreads from cell B11, where the OFFSET formula is inserted.
Example 2
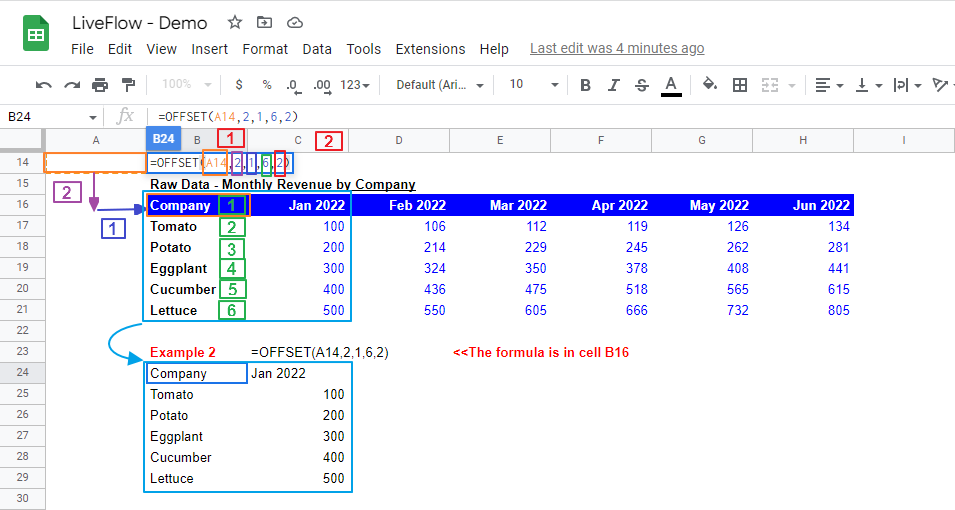
The arguments of this sample formula and their descriptions are as follows:
Cell_reference: A14 / Offset_rows: 2 / Offset_columns: 1
These three mandatory arguments mean that the starting point (cell A14) shifts to cell B16 as the “offset_rows” and “offset_columns” arguments command that the starting point moves down by two rows (visualized by the purple arrow and box) and right by one column (visualized by the dark blue arrow and box).
Height [Optional]: 6 / Width [Optional]: 2
Due to these two optional arguments, the range with 6x2 size starting from cell B16 is specified, and the array spreads from cell B24, where the OFFSET formula is inserted in this example.
How do you use the MATCH function with the OFFSET function?
The OFFSET formula is often combined with other functions to keep the output brought by the OFFSET function dynamic. We introduce one of the combinations here. Assume you have monthly revenue data by company and want to pull out revenue for a specific company for a particular month (e.g., a revenue amount of “Potato” in “March 2022”). See the following screenshot to learn how to create a formula returning the information by combining the OFFSET function and the MATCH function.
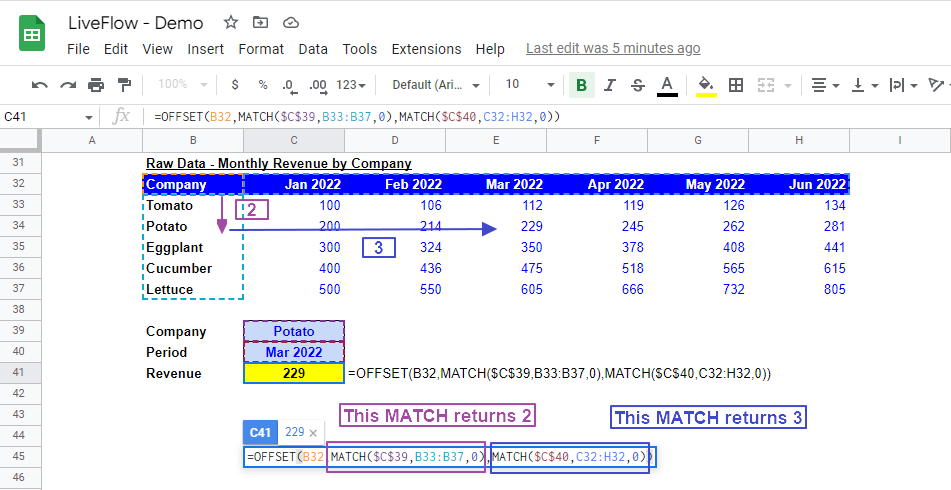
The arguments of this sample formula and their descriptions are as follows:
Cell_reference: B32
Offset_rows: MATCH($C$39, B33:B37, 0) - this MATCH function defines how many rows the starting point goes down. The MATCH returns 2 as “Potato” is in the second row in the selected range in the formula.
Offset_columns: MATCH($C$40, C32:H32, 0) - the second MATCH formula determines the number of columns by which the initial point shifts. This MATCH gives 3 because “Mar 2022” sits in the third column in the chosen range in the formula.
In summary, these three mandatory arguments say that the origination point (cell B32) shifts to cell E34 (B+”3”=E and 32+”2”=34) as the “offset_rows” and “offset_columns” arguments command that the starting point moves down by two rows (visualized by the purple arrow and box) and right by one column (visualized by the dark blue arrow and box).
Note: The “height” and “width” arguments are blank and considered zero.
In this example, the OFFSET is used to look up a specific value. The combination of the INDEX and MATCH functions is also often used for this purpose. Check this article to learn how to create a dynamic search: How To Create Dynamic Dashboards with Index/Match. If you are interested in other formulas to pull out specific information, read the following articles.