
How to Move Sheets in Excel
In this article, you will learn how to quickly move worksheets within an Excel workbook and between different Excel workbooks.
Why do you need to move tabs in Excel?
There are several reasons why you may need to move sheets in Excel:
Reorganizing the Workbook: Sometimes, you may want to rearrange the order of the sheets within an Excel workbook to make it easier to navigate or to group related sheets together.
Sharing Excel Files: If you are sharing an Excel workbook with others, you may want to move sheets to a new workbook and create a separate version of the file for them to work with.
Consolidating Data: You may need to move sheets to consolidate data from multiple sheets into one sheet.
Copying Sheets: When you need to make a copy of a sheet, you can move it to a new Excel workbook and save it as a new file.
Archiving Data: If you have old data that you want to keep for reference, you may want to move it to a separate workbook to keep your active workbooks clean and organized.
Overall, moving sheets in Excel can help you to better organize your data and make your Excel files easier to manage.
How to move spreadsheets in Excel?
This section describes a step-by-step process to move a tab within a workbook or to another workbook.
Step 1: Select the spreadsheet (which you wish to move) by left-clicking on the tab name
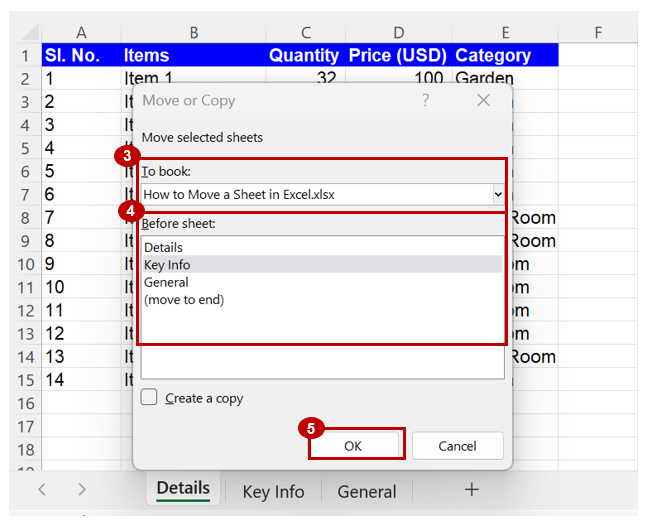
Step 2: Right-click and select the ‘Move or Copy’ option
Instead, if you are a Windows user, you can press the “Alt”, “E” and “M” keys. This will open up a dialogue box described in Step 3.

Step 3: Under ‘To book:’ the current workbook will be selected by default (which means the sheet selected in step 1 will be moved within the same Excel workbook).
In case you want to move the selected sheet to another workbook (ensure the other workbook is also open in Excel), select the relevant workbook name from the drop-down menu.
Step 4: Under ‘Before sheet:’ select the sheet to the left of which you want to move the sheet or select ‘(move to end)’ to move the spreadsheet to the end.
Step 5: Click on ‘OK’
Analyze your live financial data in a snap in Google Sheets
Are you learning this formula to visualize financial data, build a financial model, or conduct financial analysis?
In that case, LiveFlow may help you automate manual workflows, update numbers in real-time, and save time. You can access various financial templates on our website, from the simple Income Statement to Multi-Currency Consolidated Financial Statement. Are you interested in this product but are an Excel user? That’s not a problem at all. You can connect Google Sheets to Excel quickly.
To learn more about LiveFlow, book a demo.
You can learn about other Excel and Google Sheets formulas and tips that are not mentioned here on this page: LiveFlow‘s How to Guides


